For a long time, basements weren’t meant to be much more than storage areas for crops and other items that required cool, dark spaces. As time went on and mechanical systems like furnaces, boilers, and water heaters became prevalent, basement concrete slabs were poured directly over substrate material. This gave basements a solid and stable base and prevented rodents from entering the home.
Nowadays basements are often viewed as an extension of conditioned living space. Basement concrete slabs have gone from a thin layer of concrete poured over dirt, to an extensively prepped, 4-inch slab designed to increase energy efficiency and keep the home sealed from moisture.
A properly prepped and poured basement concrete slab is a pivotal component of a healthy and dry living space. If you are reading this, it’s likely you are experiencing issues with your concrete slab. Whether that be wicking, seepage, cracking, or heaving, understanding the issues that plague your basement floor will go a long way in helping you make informed decisions for the longevity of your home.
The significance of a well-designed basement concrete slab cannot be overstated. It serves as the bedrock of your home’s structural integrity and functionality, impacting your property in multiple ways. In this article, we will dive deep into the pivotal role of a properly installed basement concrete slab and its implications for your home. We’ll also investigate the common issues that homeowners may encounter and provide practical solutions to improve them.
Understanding Basement Construction
To understand the role your basement concrete slab plays in your home, it’s important to understand how a basement is constructed. There are three major structural components in an average residential basement:
- The Footing: First to be poured in a new basement build is the footing. The footing provides support beneath basement foundation walls and columns. They are designed to distribute the load of the home evenly into the soil below.
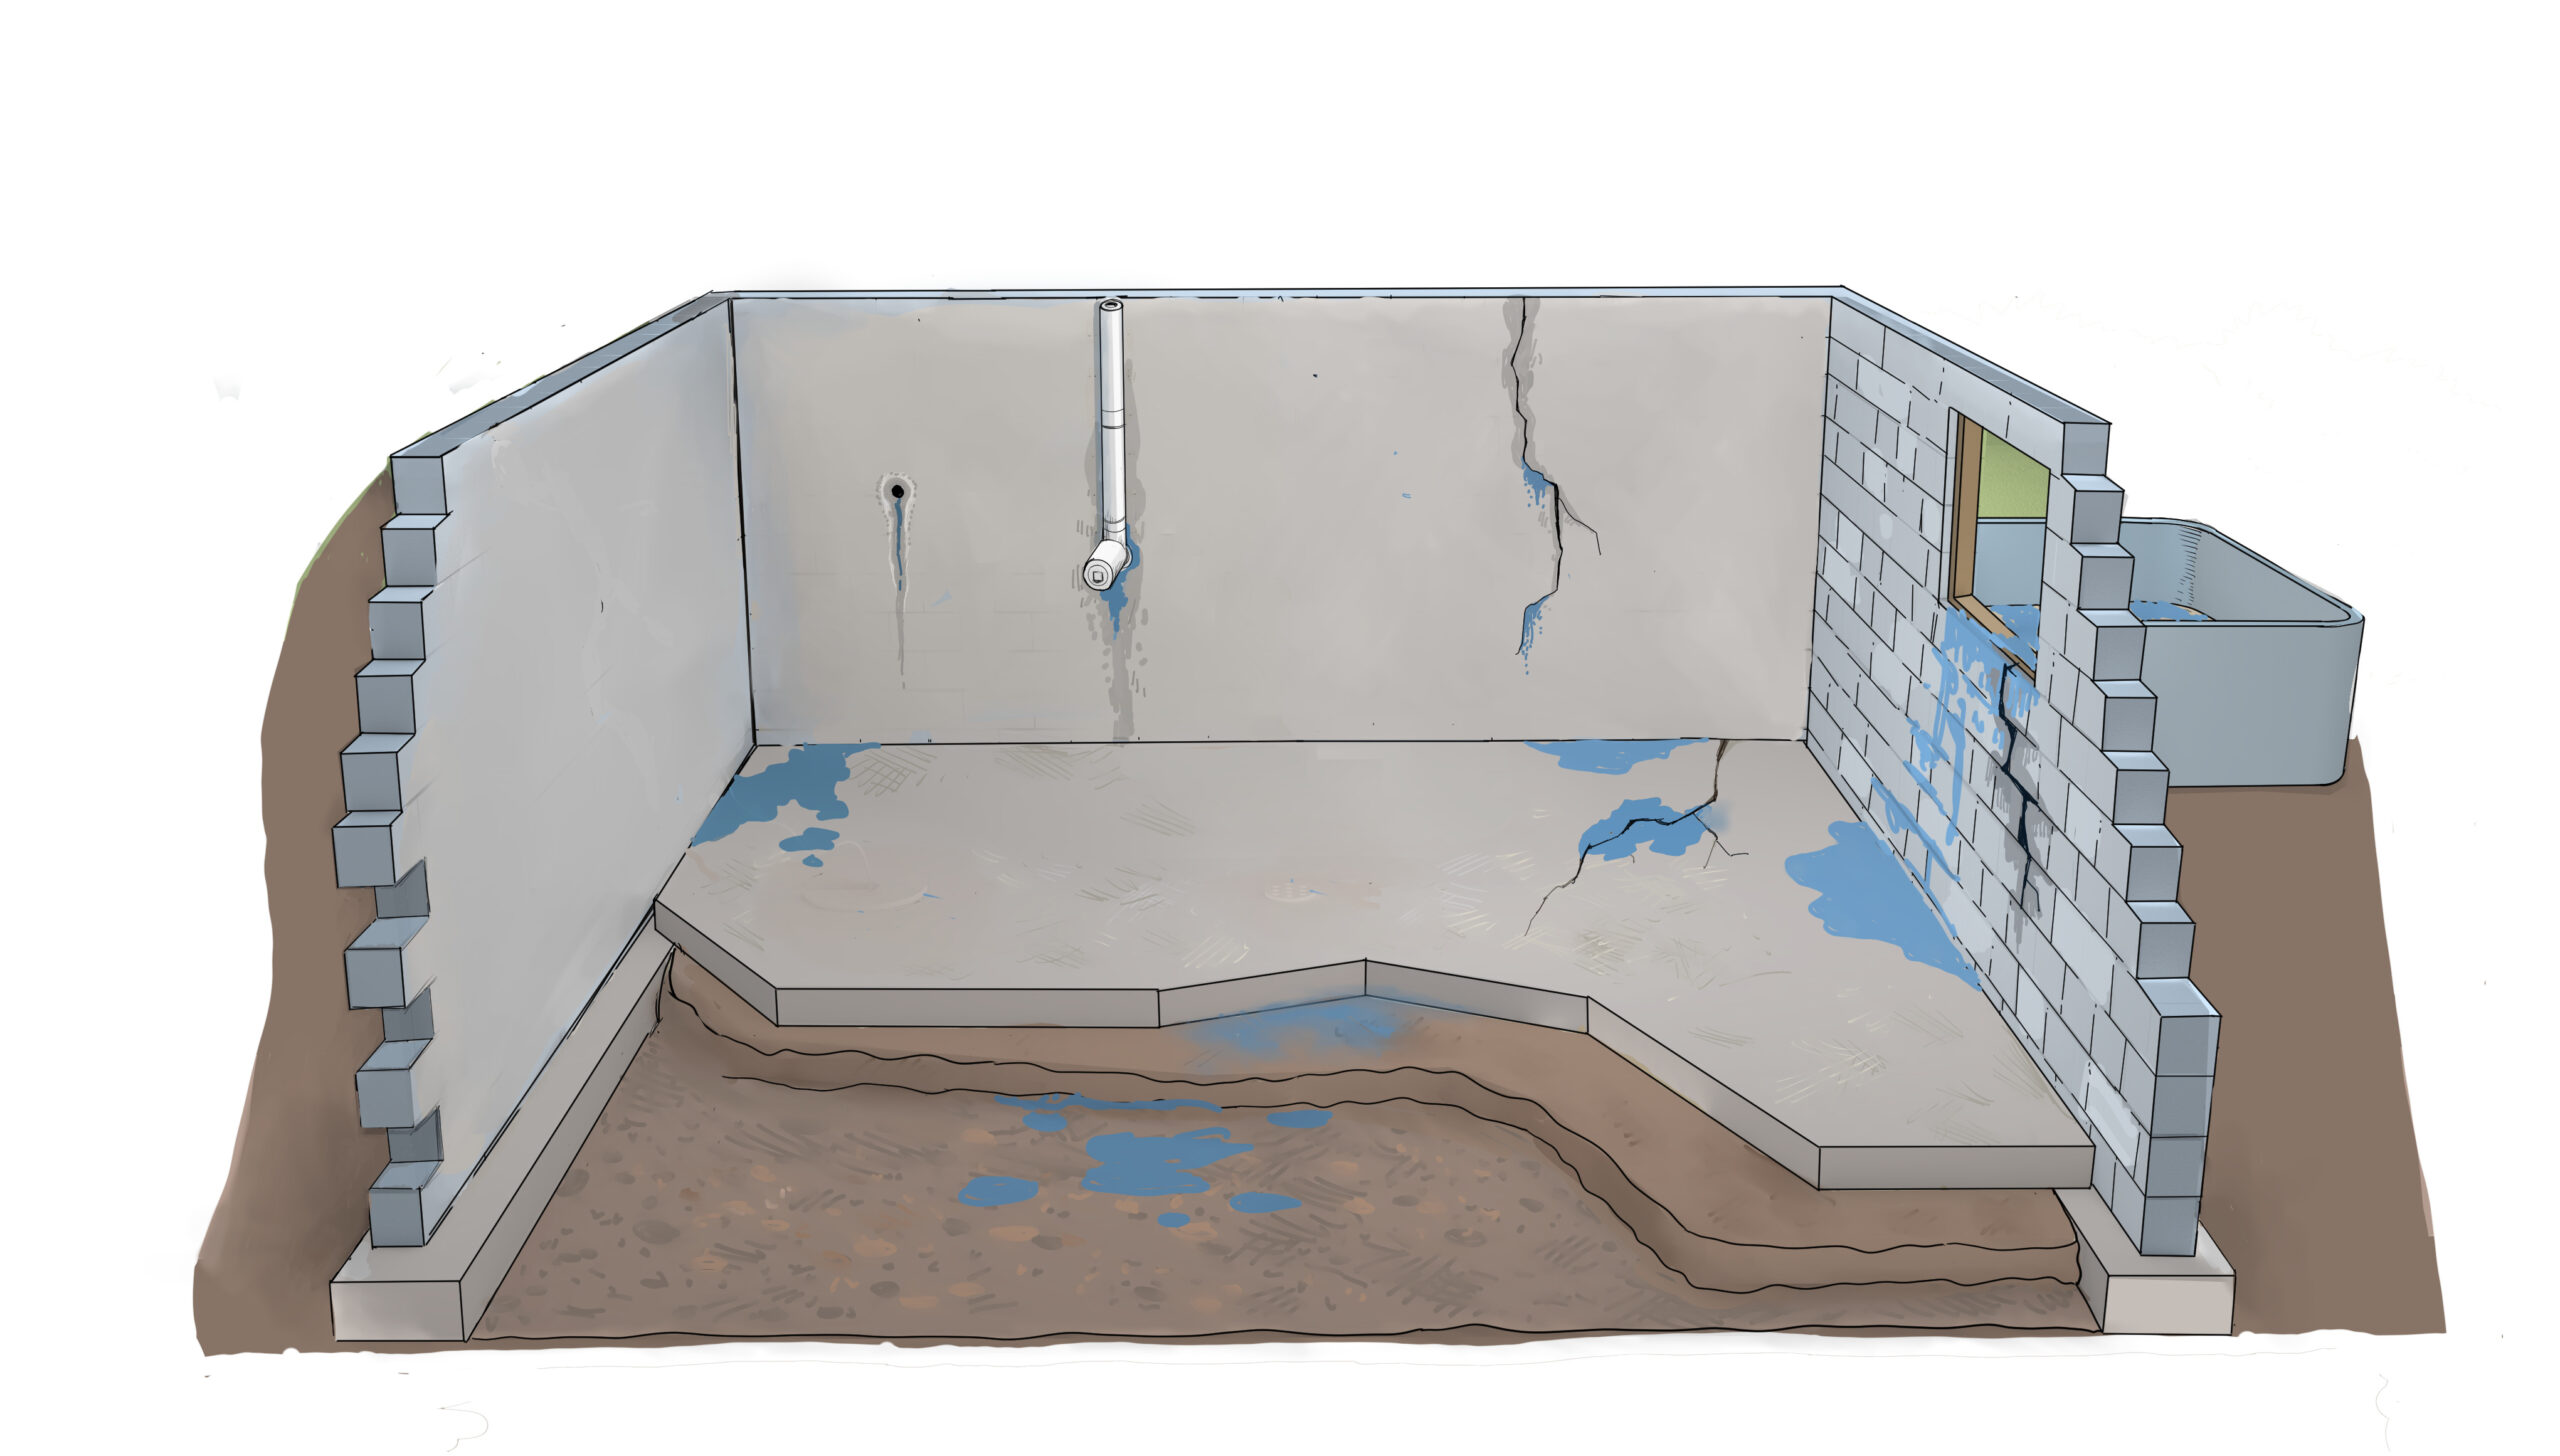
- The Wall: Basement walls are installed next and are typically constructed of poured concrete, or concrete blocks. In New England we often see older homes built with fieldstone foundations. Basement walls support loads from the structure above and the soil outside and sit on top of the footing.
- The Floor: Basement concrete slab floors are designed to support floor loads and are allowed to move independent of the footing and foundation walls. In residential homes your basement concrete slab is not reinforced and should be properly prepped to reduce moisture infiltration (we’ll get into that later).
It’s important to note that in some circumstance special construction techniques may be necessary. This is often decided through consultation with a structural engineer and can lead to your concrete becoming more structural in nature. This is an important consideration when deciding to work on your basement slab in the future.
Common Basement Concrete Slab Waterproofing Issues:
Your residential basement slab is designed to support floor loads and give your basement a solid base to stand on, however, concrete in and of itself is not a good waterproofing material. Therefore, it’s important to properly prepare your slab to manage moisture issues in your basement. If your slab is not properly prepped, then there are a variety of issues that can arise:
Wicking
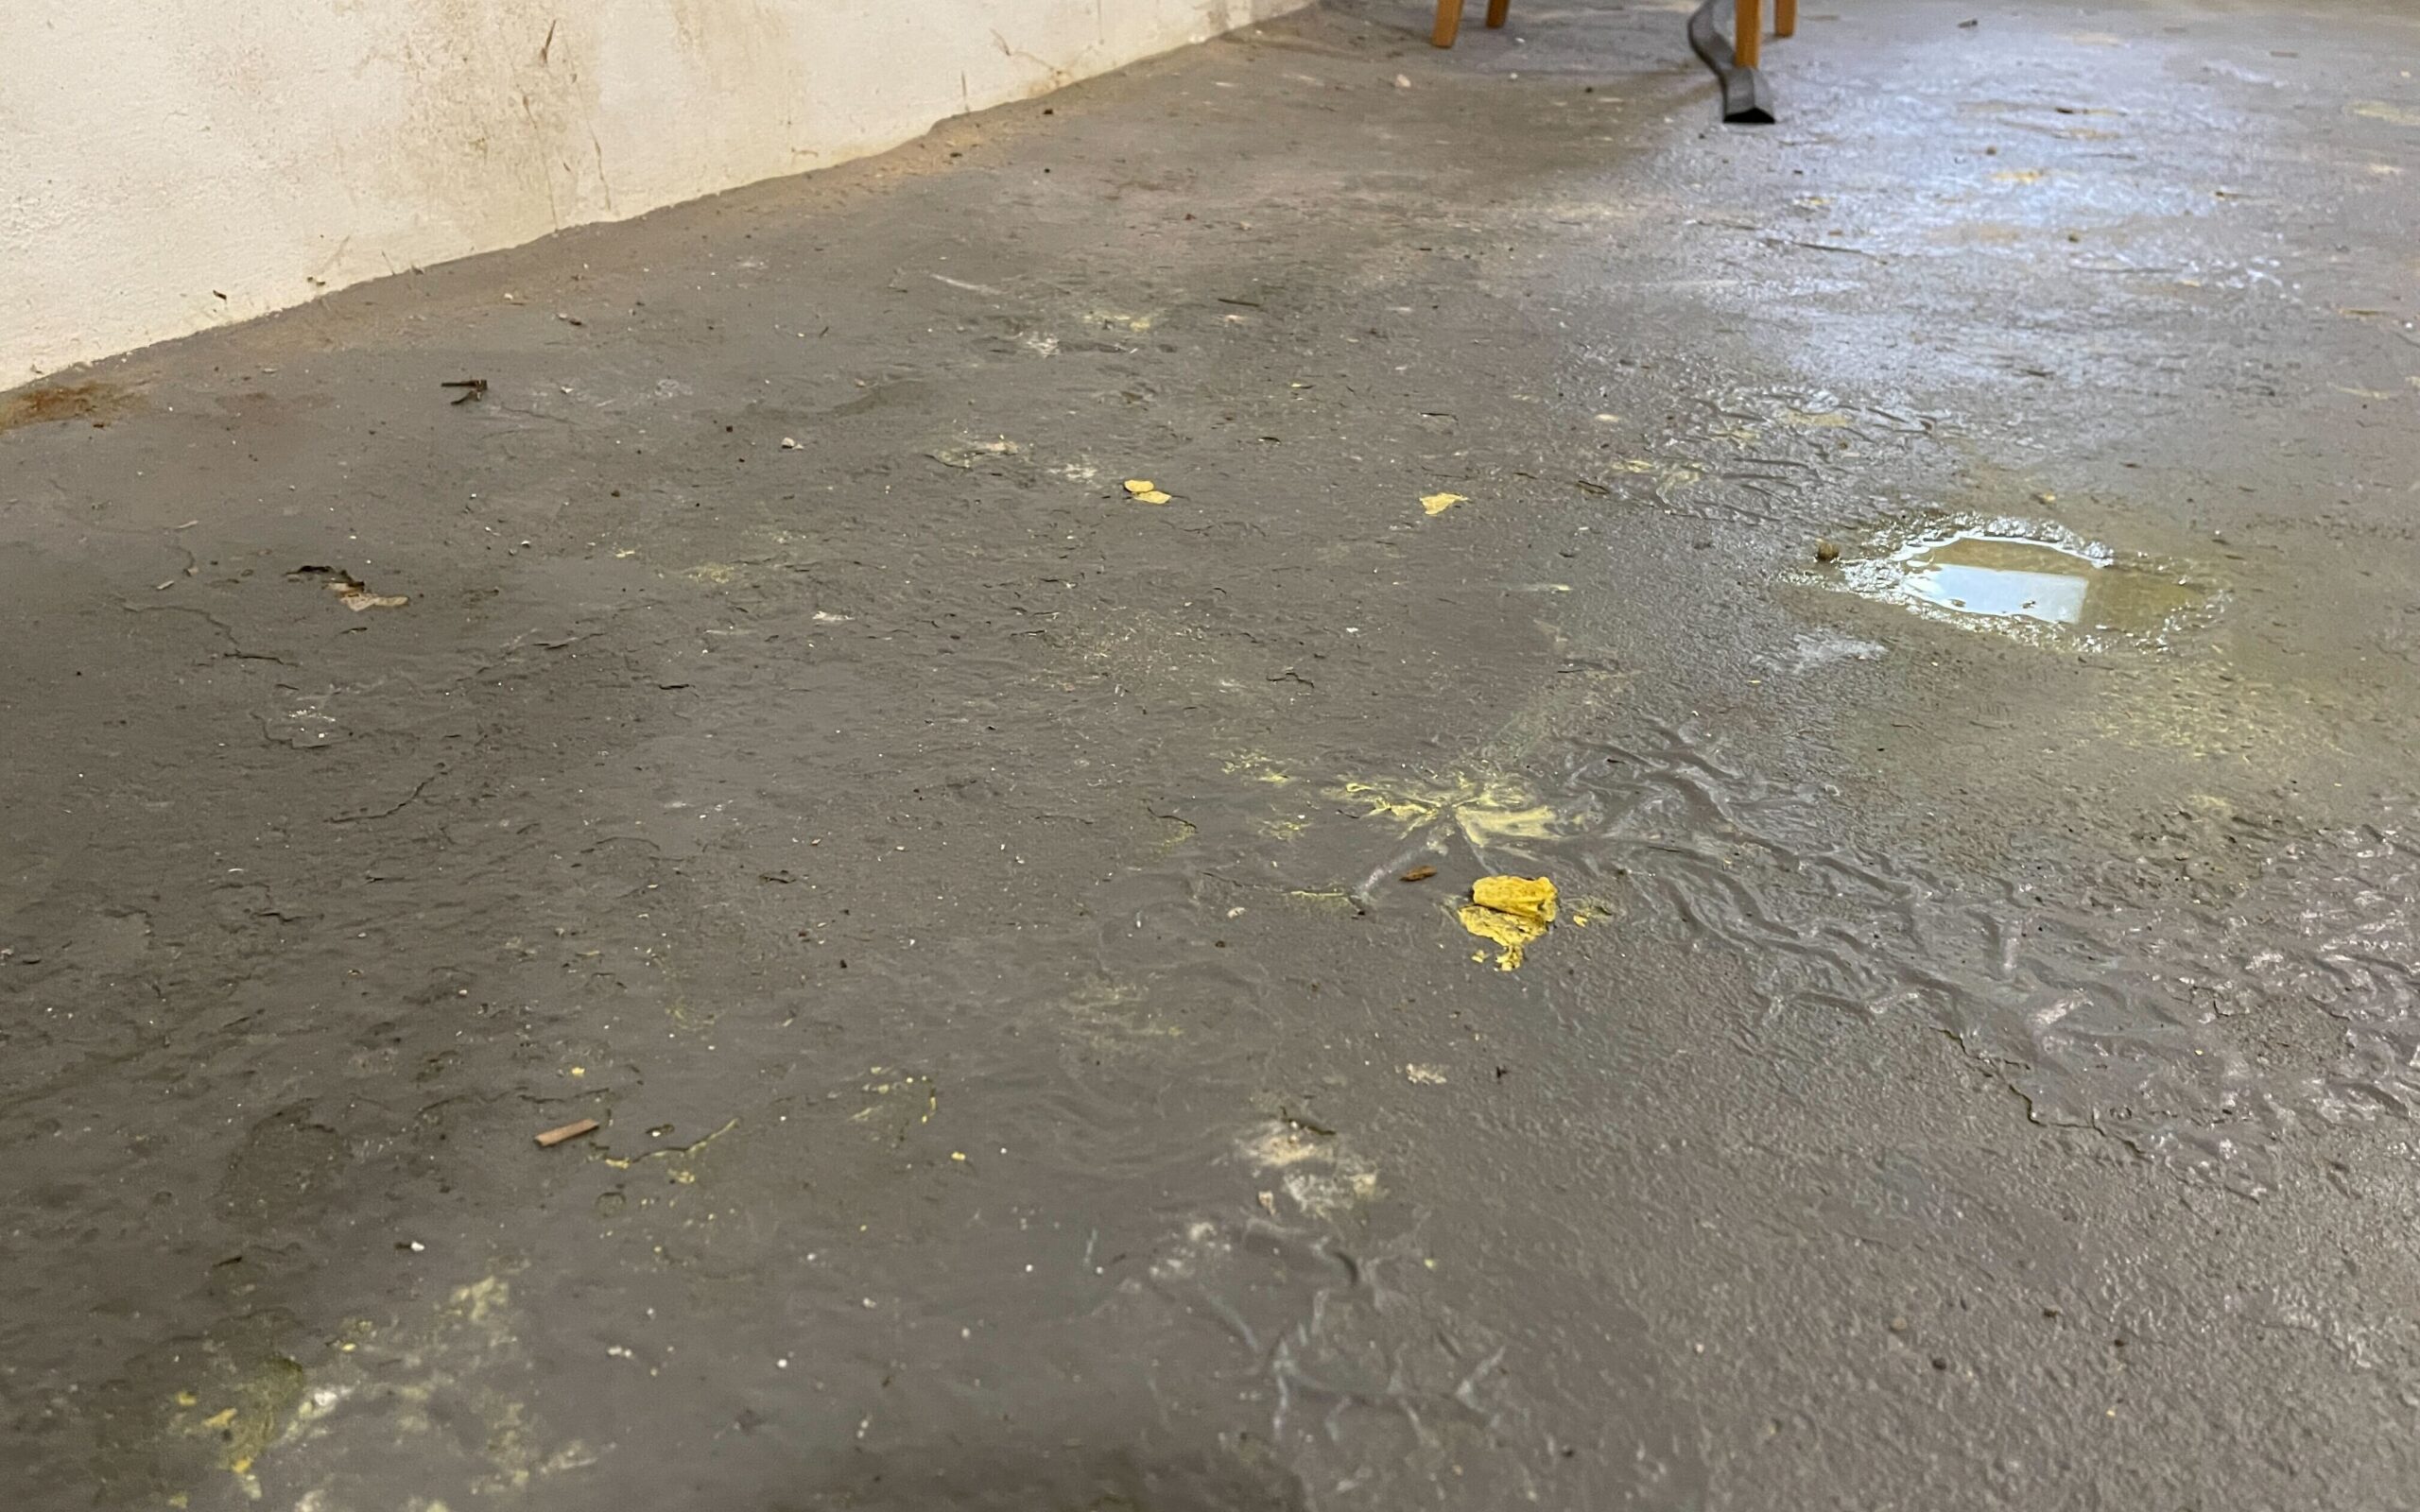
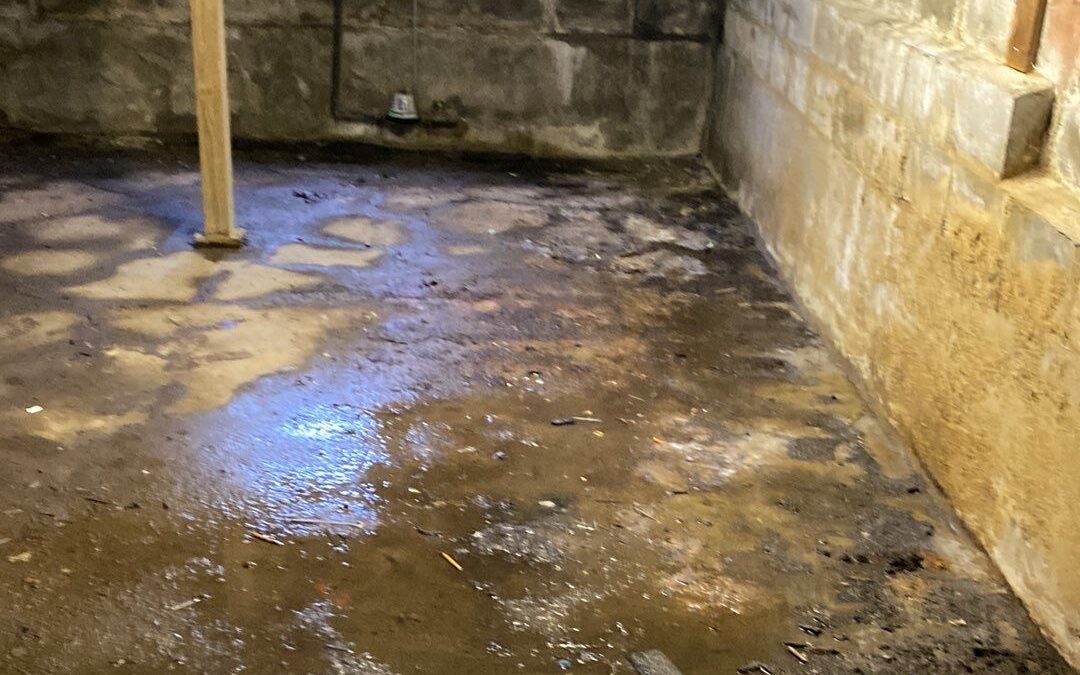
Wicking happens when your concrete slab is poured directly over the moist soil beneath your home. Concrete’s porous nature causes it to act like a sponge, wicking up moisture from below the slab and appearing on the surface of your basement floor.
A major sign of wicking is the presence of moisture patches on your slab with no clear cause. These patches will often be located away from your walls and will not have a path of travel that you can identify. You may also notice wicking if you store cardboard boxes directly on your concrete floor. When you go to move the boxes, you notice that the cardboard is damp but there is no clear indication of flooding or leaking anywhere in the basement.
If you have sealed your floor with an applied waterproofing product such as Drylok and are noticing bubbling in the center of your floor that indicates the presence of moisture. You could be experiencing wicking.
Uneven Slab
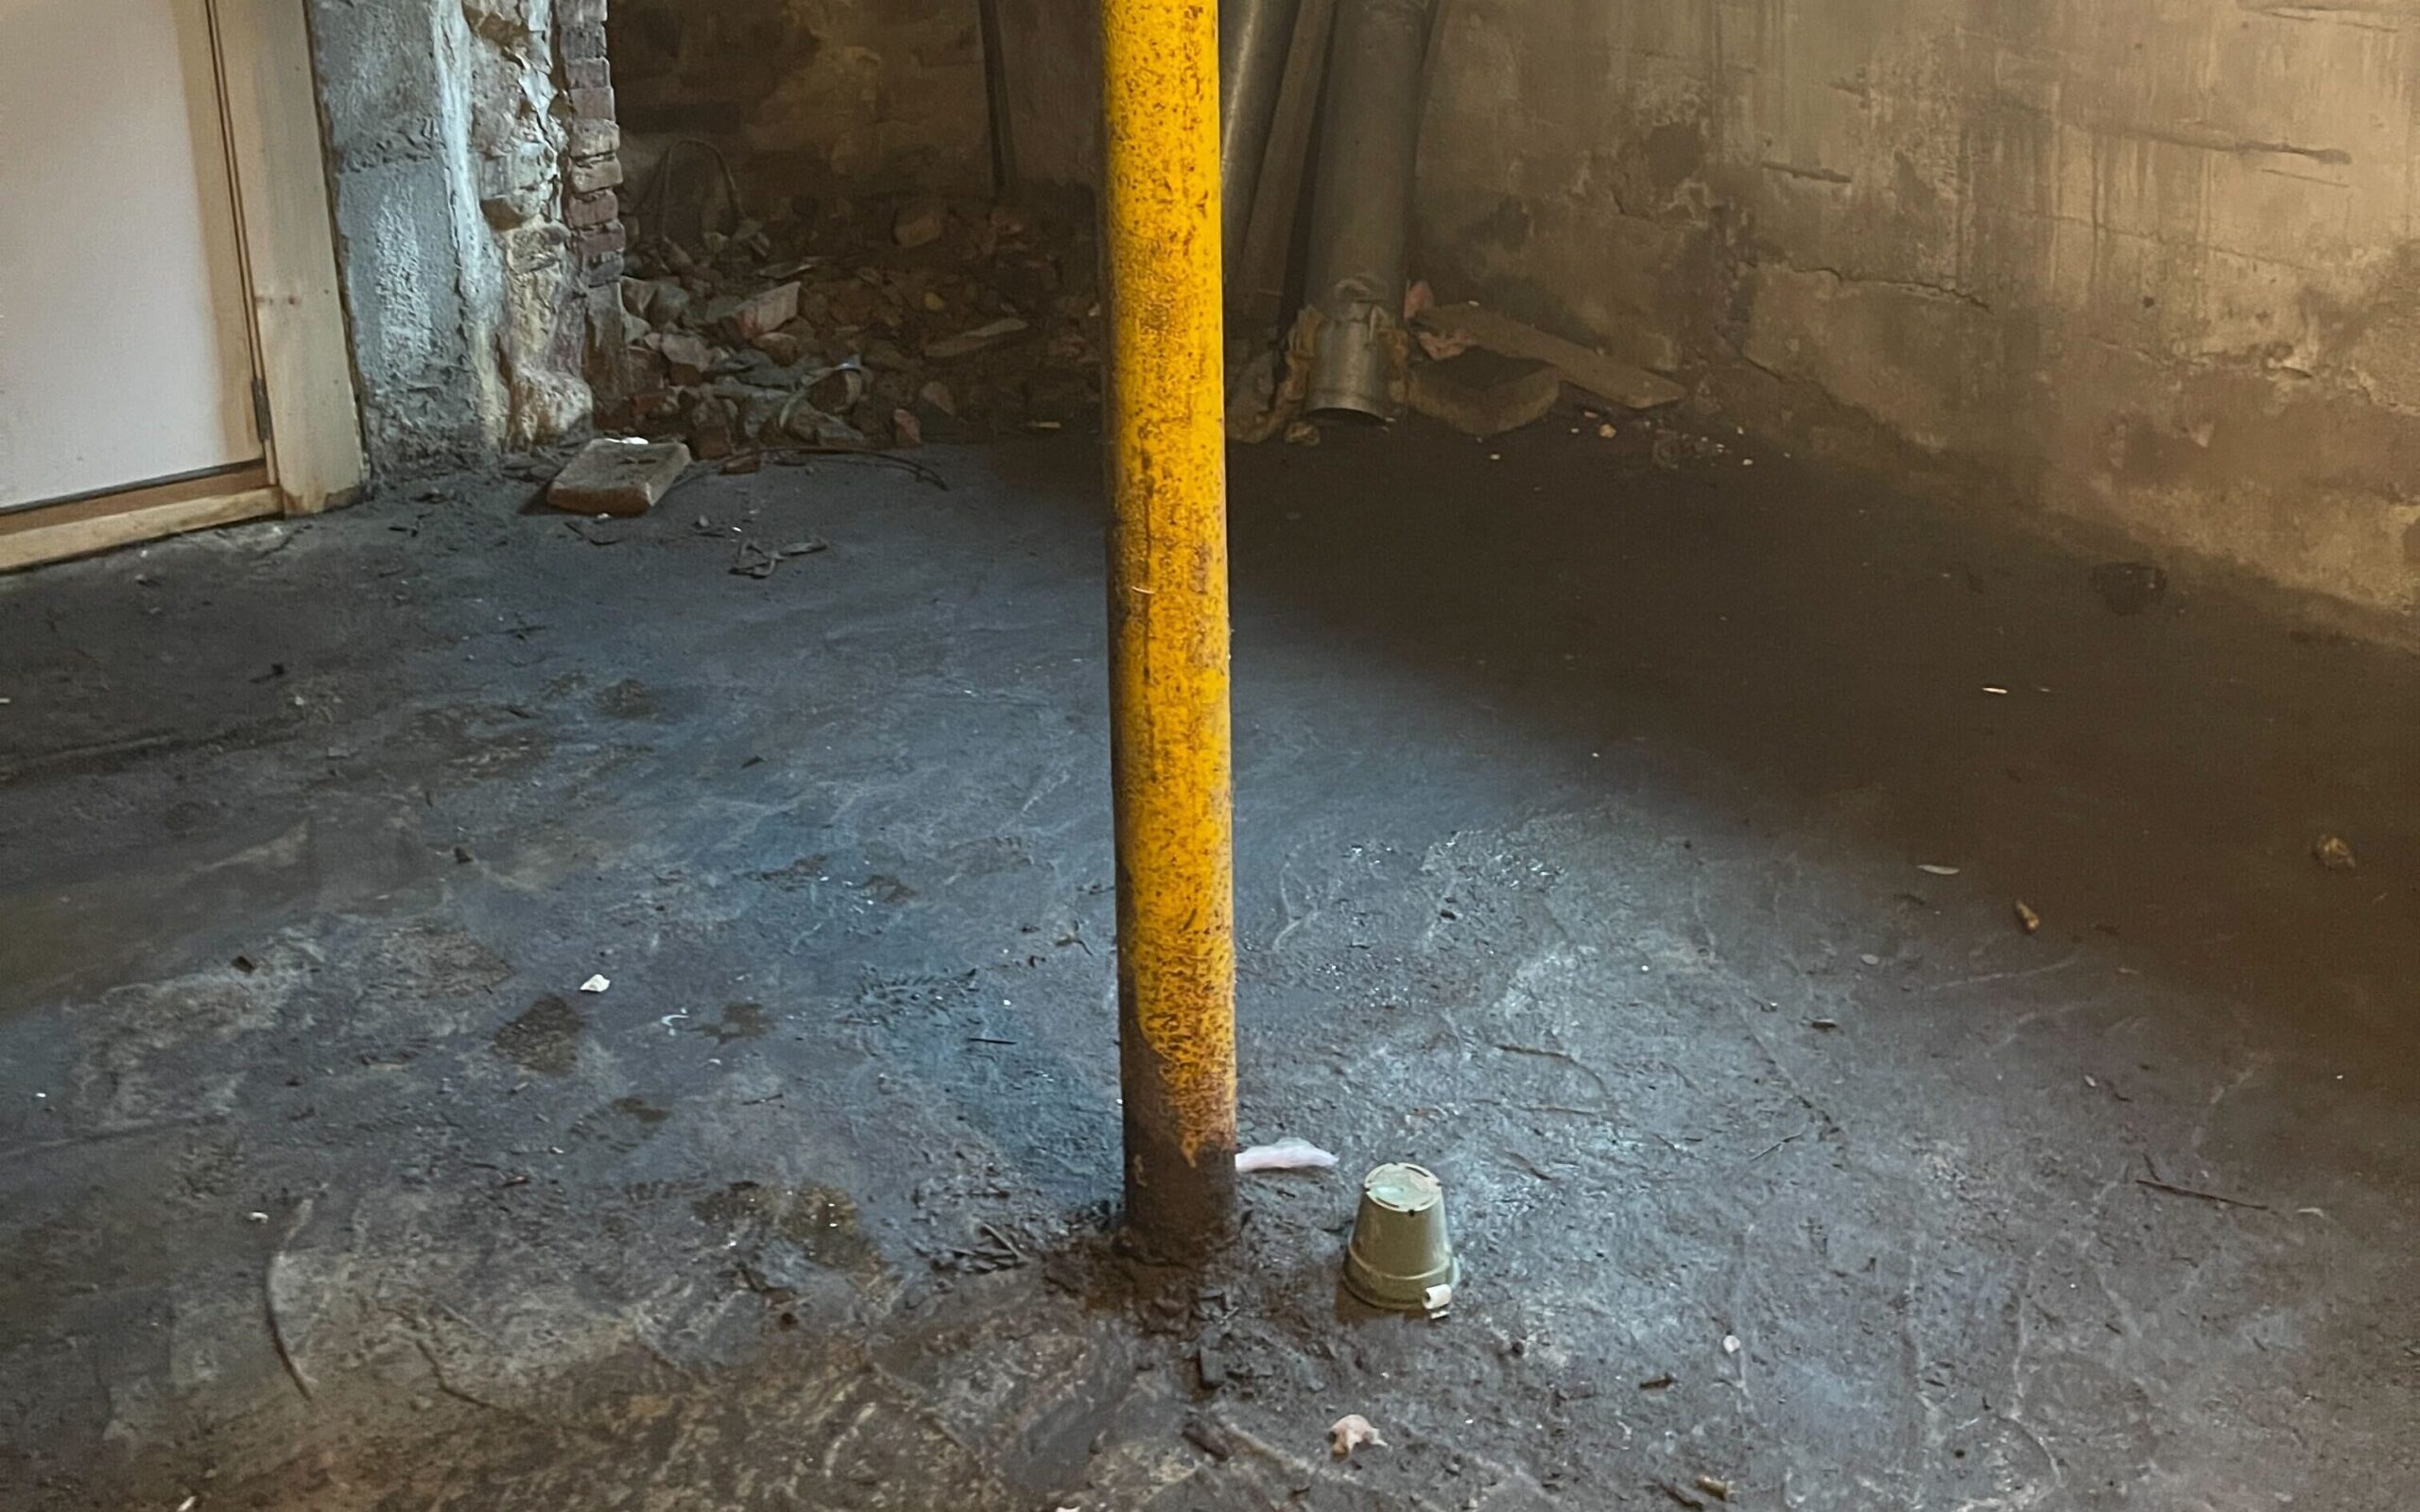
If your concrete basement slab was poured directly over the subgrade material below your home, you may notice that your concrete floors are bumpy and uneven. This is more common in older homes that were constructed when the standards of pouring concrete floors were much lower. You can expect to have a host of moisture issues if this is the case.
Seepage
Seepage is caused by hydrostatic pressure. Hydrostatic pressure is the pressure exerted by a fluid. In the case of basement waterproofing, hydrostatic pressure occurs when water accumulates along your foundation walls and under your basement concrete slab. If this water cannot drain or percolate fast enough, then it will begin to exert pressure against the walls and floor. The pressure will force water up through cracks in your basement floor and through the joints where the slab meets the foundation wall.
Seepage is a major contributor to basement flooding. If you can observe your basement during a heavy rainstorm, you may see water actively leaking through these weak points. If you are not around for active leaking, then you can identify seepage by keeping an eye out for the common signs:
- Damp or wet spots around the joints and cracks in your basement concrete slab.
- A white powdery substance called efflorescence in the same areas.
- Rust on metal items such as furnaces, water heaters, or metal shelves.
- New and worsening cracks in your slab.
Cracking
As mentioned above, a cracking concrete slab can be an indicator of hydrostatic pressure building under your basement floor. However, not all cracks are created equal. Cracking in your concrete slab is a common occurrence and can, in some cases, be attributed to settlement and naturally occurring movement in the earth beneath your home. Determining the cause of cracks in your basement concrete slab can be difficult but here are some tips to help you:
Location:
- Hydrostatic Pressure: Cracks caused by hydrostatic pressure often appear in your slab at the lowest point in your basement.
- Settlement Cracks: These can appear anywhere, however, a properly prepped slab will have relief joints installed (more on that later) which will cause settlement cracks to follow a uniform path.
Pattern of the Crack:
Hydrostatic Pressure:
- Cracks due to hydrostatic pressure can run in various directions and might appear more random compared to settlement cracks.
- They can radiate from a central point or follow the path of least resistance through the slab.
- They might also manifest as multiple small cracks converging in a specific area, indicating a point where water pressure is pushing upwards.
- In some cases, they can create a bulging or domed appearance, suggesting the concrete is being pushed up from below.
Settlement Crack:
- They tend to run linearly and can appear anywhere on the floor.
- They might be straight or slightly jagged but usually follow a more predictable path.
- Settlement cracks can branch out or intersect, especially if there are multiple points or areas of settlement.
- They often appear near the perimeter of the slab, over areas with different soil types, or in areas that support heavier loads.
Presence of Water:

- Hydrostatic Pressure: the presence of water around cracks or joints is a strong indication of hydrostatic pressure. The water will typically enter the basement at the point where the wall meets the floor.
- Settlement cracks: While these cracks can sometimes allow moisture in, especially during heavy rains, they don’t consistently leak as those caused by hydrostatic pressure.
How to Fix Basement Concrete Slab Waterproofing Issues:

Basement waterproofing is a system of components that work together to address water intrusion in your home. There are a variety of techniques that you can use to lessen the impact of water intrusion on your basement slab including, grading your land, fixing your gutters, and repairing foundation wall cracks. However, in this article, we’ll focus on solutions that directly affect the waterproofing of your basement concrete slab.
There are three main solutions that can be used to waterproof your basement slab. Which one you use will be mostly determined by the issue that plagues your slab in the first place. The three options we’ll discuss here are sump pump installation, French drain installation, and concrete slab replacement.
Sump Pump Installation:
A sump pump is the heart of any basement waterproofing system. It provides a bird’s eye view into the ground beneath your concrete slab and gives you the option to expand into a more robust waterproofing system with the installation of a French drain.
A sump pump is the least invasive and most cost friendly option of the three, however, it’s also the least comprehensive solution. A sump pump is commonly installed in a sump pit or sump basin, which collects water until the float switch is triggered, turning on the pump and removing water from your basement.
A sump pump is only scratching the surface of basement concrete slab waterproofing. They can act as a last resort for basement flooding by collecting water that accumulates in your basement from failed components such as burst pipes or faulty water heaters. They offer focused waterproofing efforts for the area of your basement most affected by water intrusion.
Sump pumps can be a highly effective solution for basement waterproofing if your slab is properly prepped (more on that soon) and your pump has the capacity to handle all the water.
A sump pump can address the following issues:
- Reduction of hydrostatic pressure in a localized area of your basement
- Prevention of catastrophic flooding
- May help reduce the presence of water depending on placement and severity of the issue
French Drain Installation:
A French drain, or interior perimeter drain, is a comprehensive waterproofing solution that, in most circumstances, will solve your basement concrete slab waterproofing issues. It’s important to note that there are interior French drains and exterior French drains. In this article we will focus on interior drain systems.
An interior French drain requires the installation of a sump pump. The drain is installed along the perimeter of your basement in a 12-inch by 12-inch trench filled with crushed stone and perforated pipe. The pipe is pitched towards your sump pit where water collects until the sump pump turns on and pumps the water out of your house.
An interior French drain acts as a pressure relief valve for hydrostatic pressure. Water that would otherwise sit under your slab and build in pressure will follow the path of least resistance, which is the drainpipe. This will reduce the groundwater that is underneath your basement floor and prevent flooding due to seepage.
An often-overlooked benefit of a French drain is the trench. The trench acts like another catch basin and greatly increases the capacity of your system. When we install a French drain it is not uncommon to hear a customer say, “Our pump hasn’t turned on once and we’d normally be ankle deep in water by now.” This is because the water has a place to collect within the trench. If the water rises high enough it’s directed by the drainpipe, if not it will eventually drain back into the concrete beneath.
A French Drain Can Address the Following Issues:
- Reduction of hydrostatic pressure
- Prevention of basement concrete slab cracking due to hydrostatic pressure
- Prevention of seepage
- Management of groundwater
- Prevention of basement flooding
Basement Concrete Slab Replacement:
You might be thinking to yourself, why would I need to replace my basement concrete slab if a French drain will solve all my water issues? And that’s a great question. In many circumstances you won’t need to replace your whole basement slab. If you live in a newer home, chances are your concrete slab was properly prepped before it was poured. Older homes, however, can suffer from uneven floors, wicking, severe cracking and heaving, and seepage.
This is often caused by pouring a concrete floor directly over the moist soil beneath your home. This was a technique used several decades ago and is often referred to as a rat slab. As we talked about earlier basements weren’t initially meant to be conditioned living spaces. Nowadays, homeowners are looking to gain square footage in their homes and often look to their basement to do so. In order to have a livable basement free of moisture, mold, and mildew you need to properly prep your slab.
Some other reason you might want a slab replacement:
- To install ambient heated floors
- To better insulate and seal your basement
- To increase resale value
How do you Replace a Basement Concrete Slab?
Here’s the part we’ve been teasing for the whole article. How exactly do you properly prep and install a new basement concrete slab? Here’s the process we follow at Drycrete Waterproofing when we replace a homeowner basement slab:
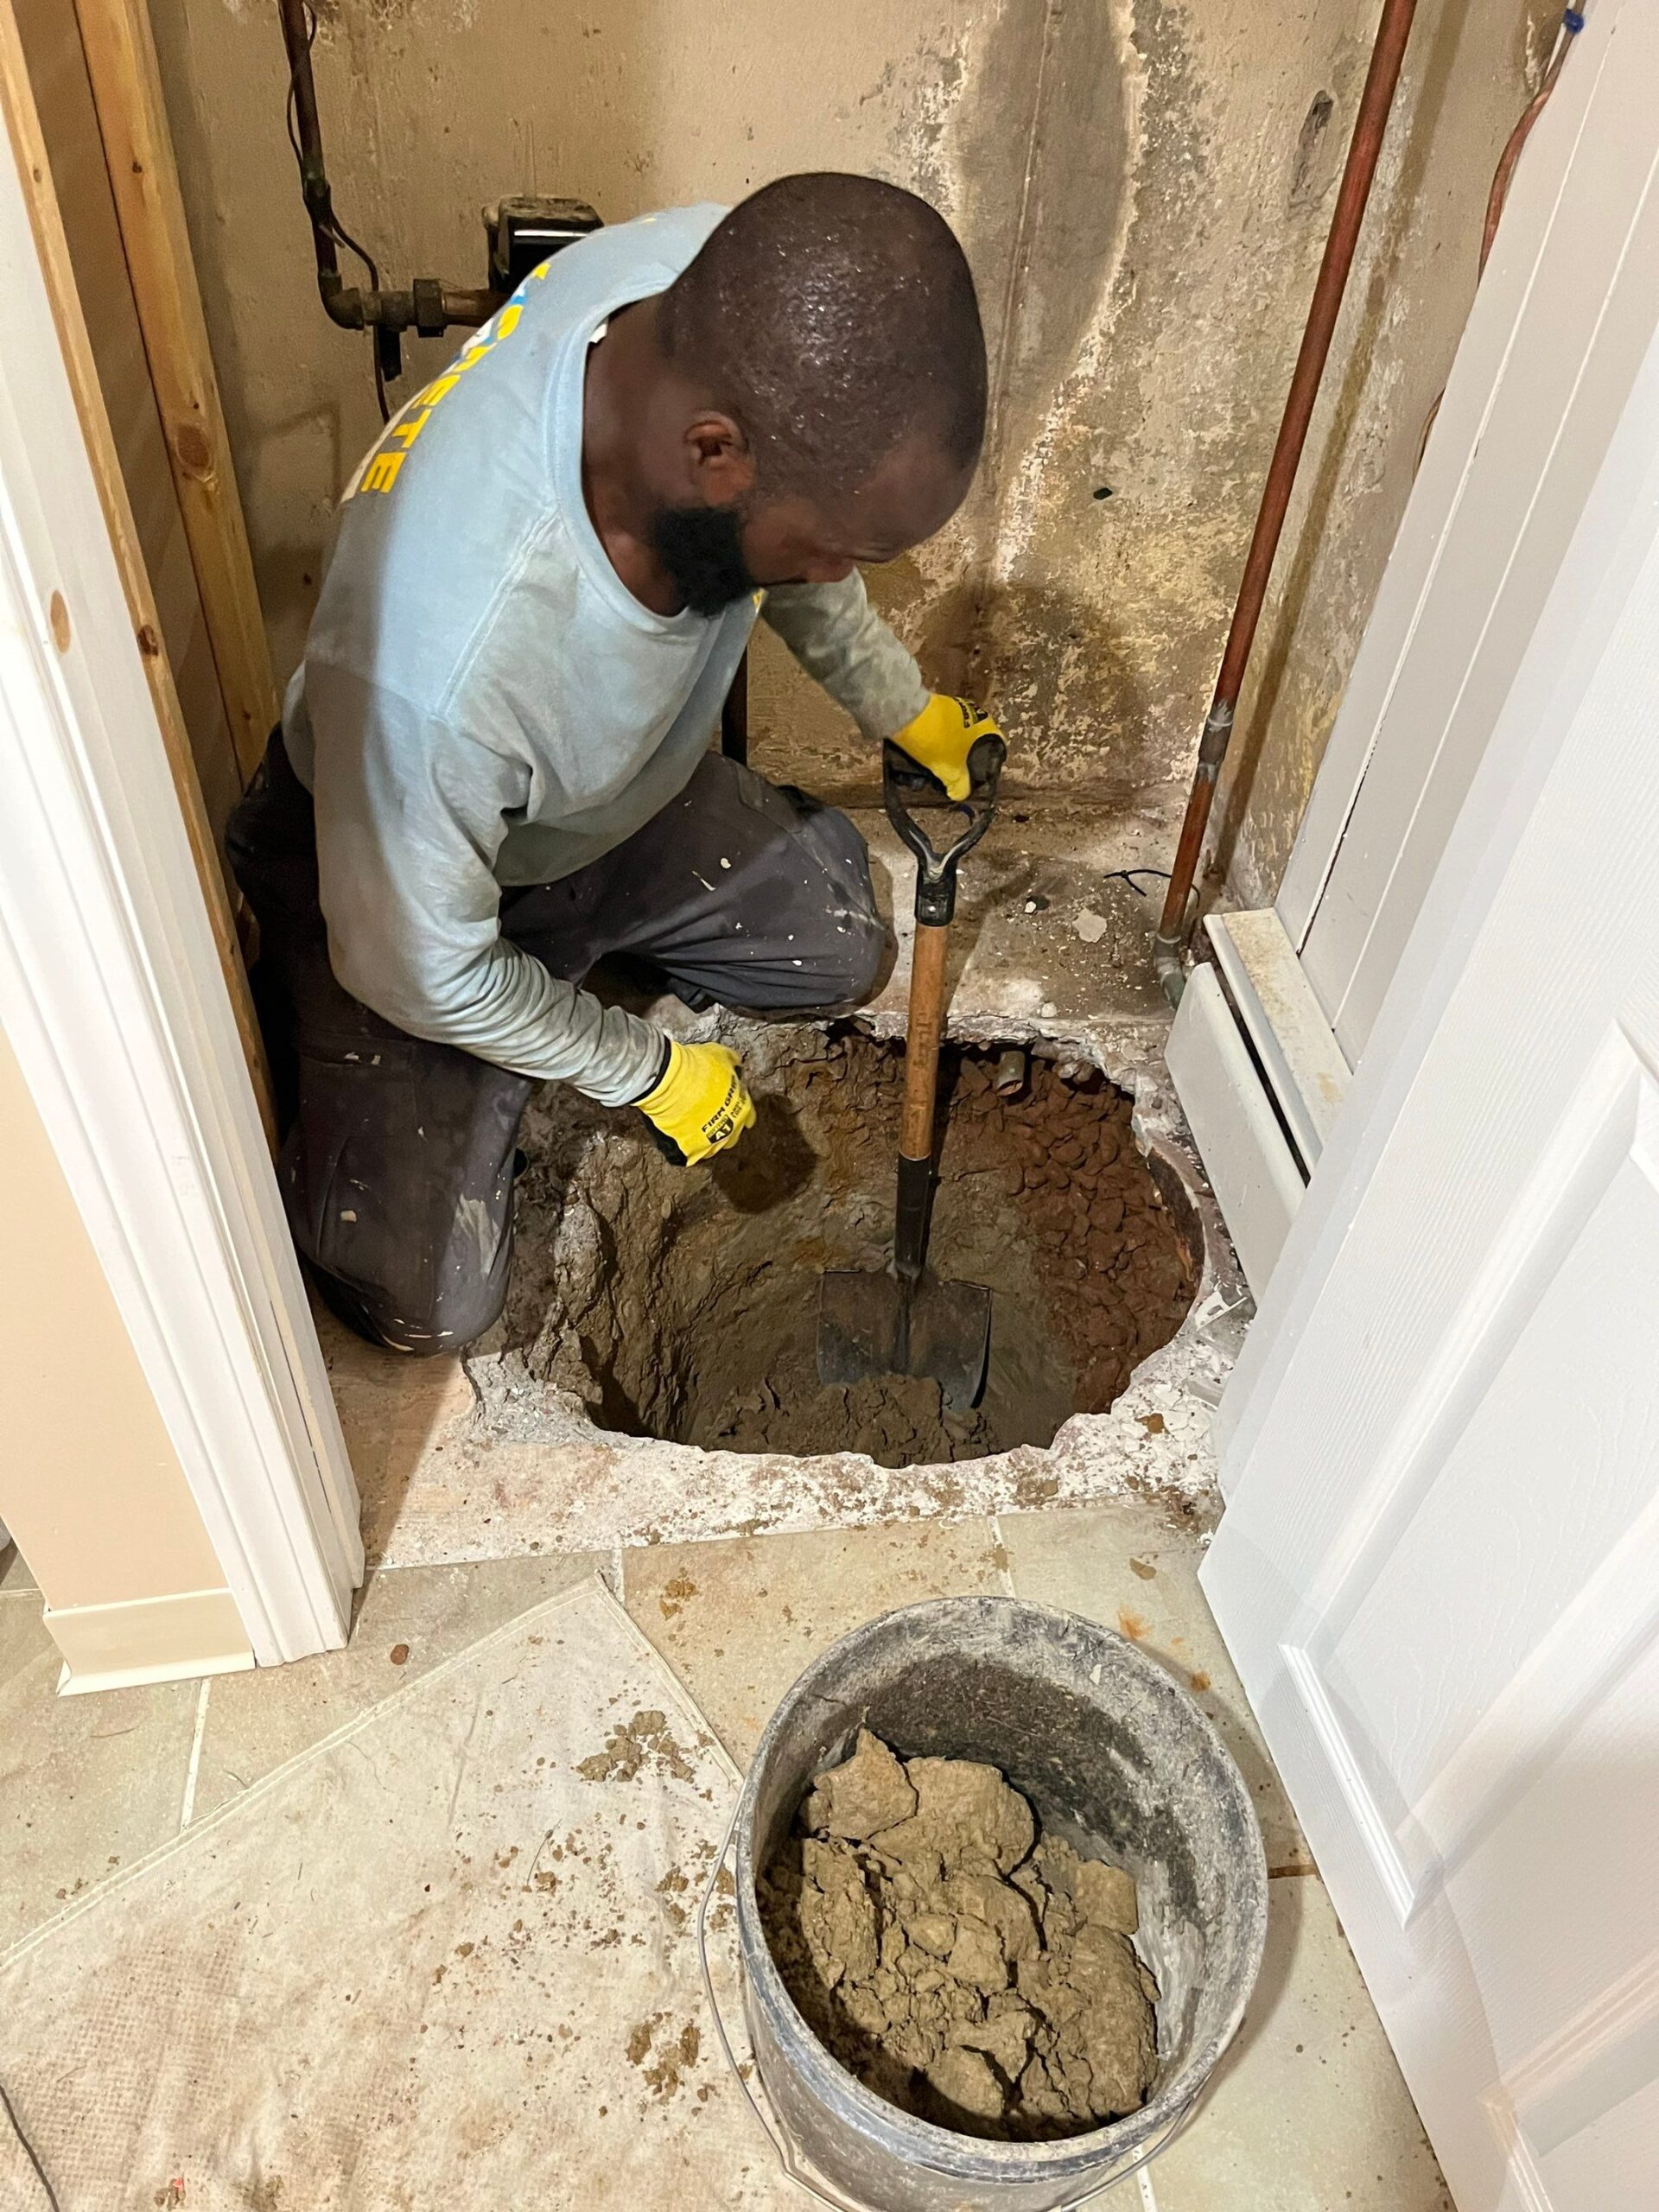
Step 1: Demo the existing floor

The team breaks up your existing concrete slab then excavates and removes the soil underneath. We dig the basement down enough to keep your existing ceiling height while adding 2 inches of crushed stone and accounting for a 4-inch slab.
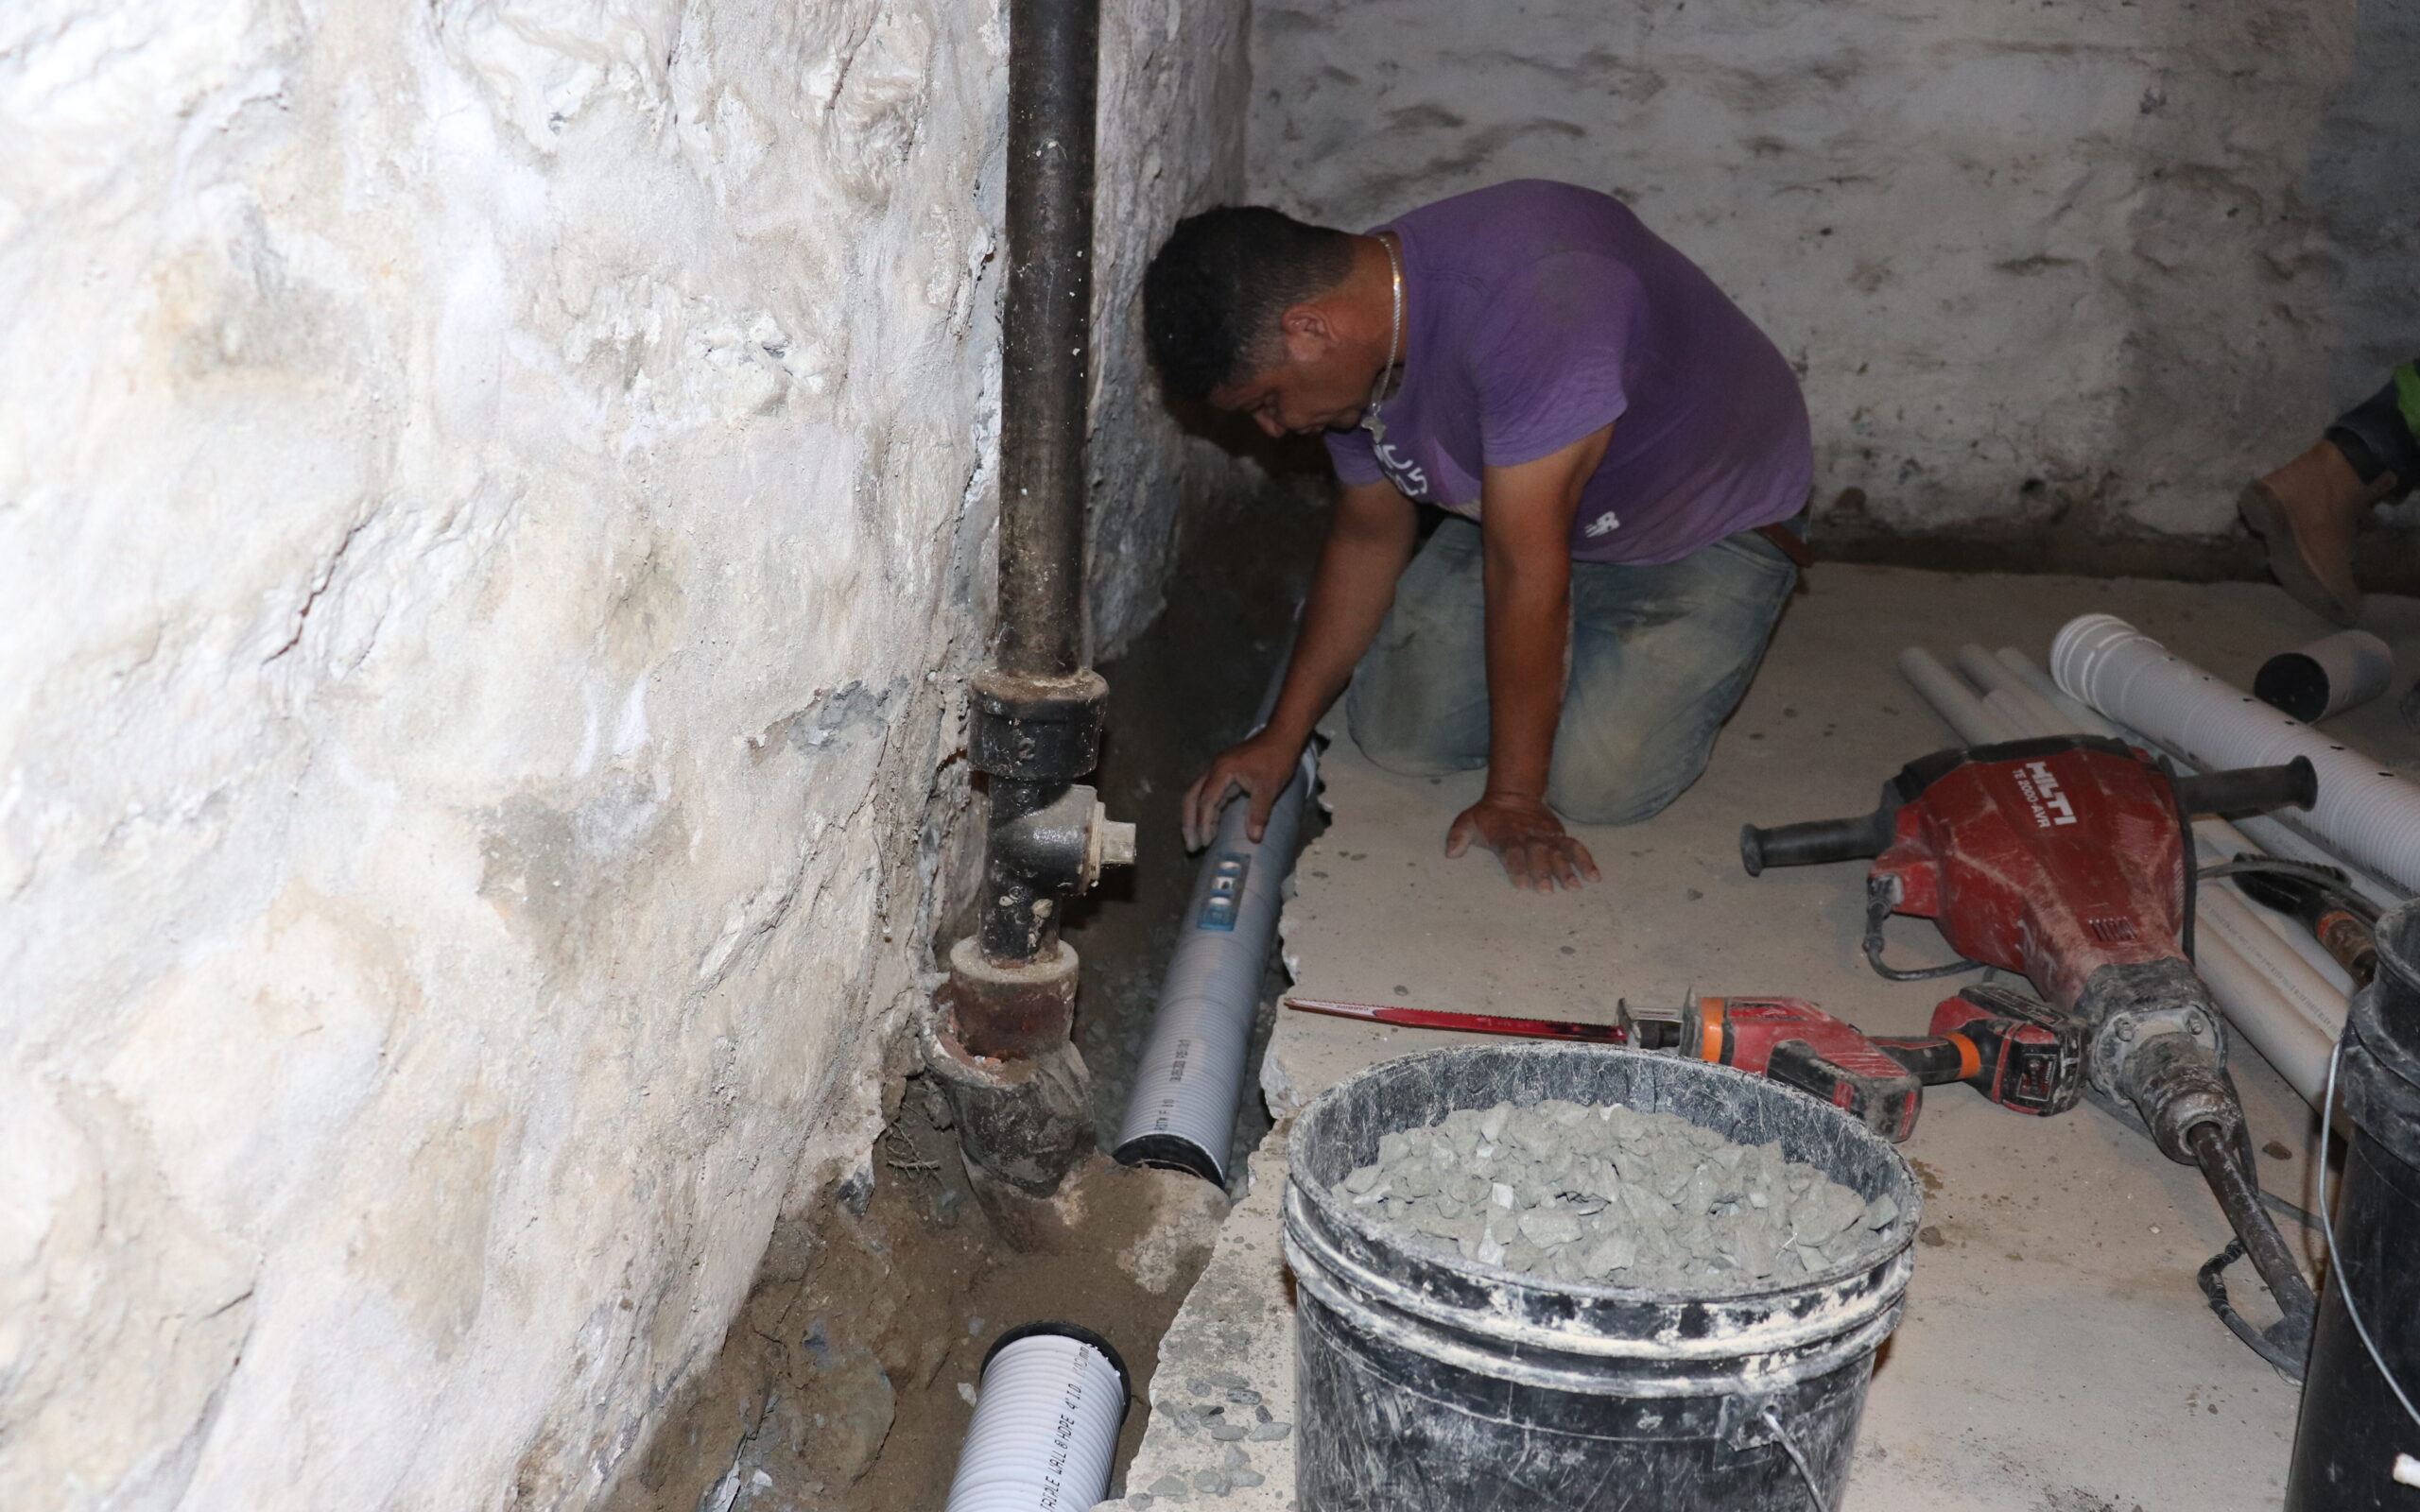
Step 2: Install French Drains and Sump Pit
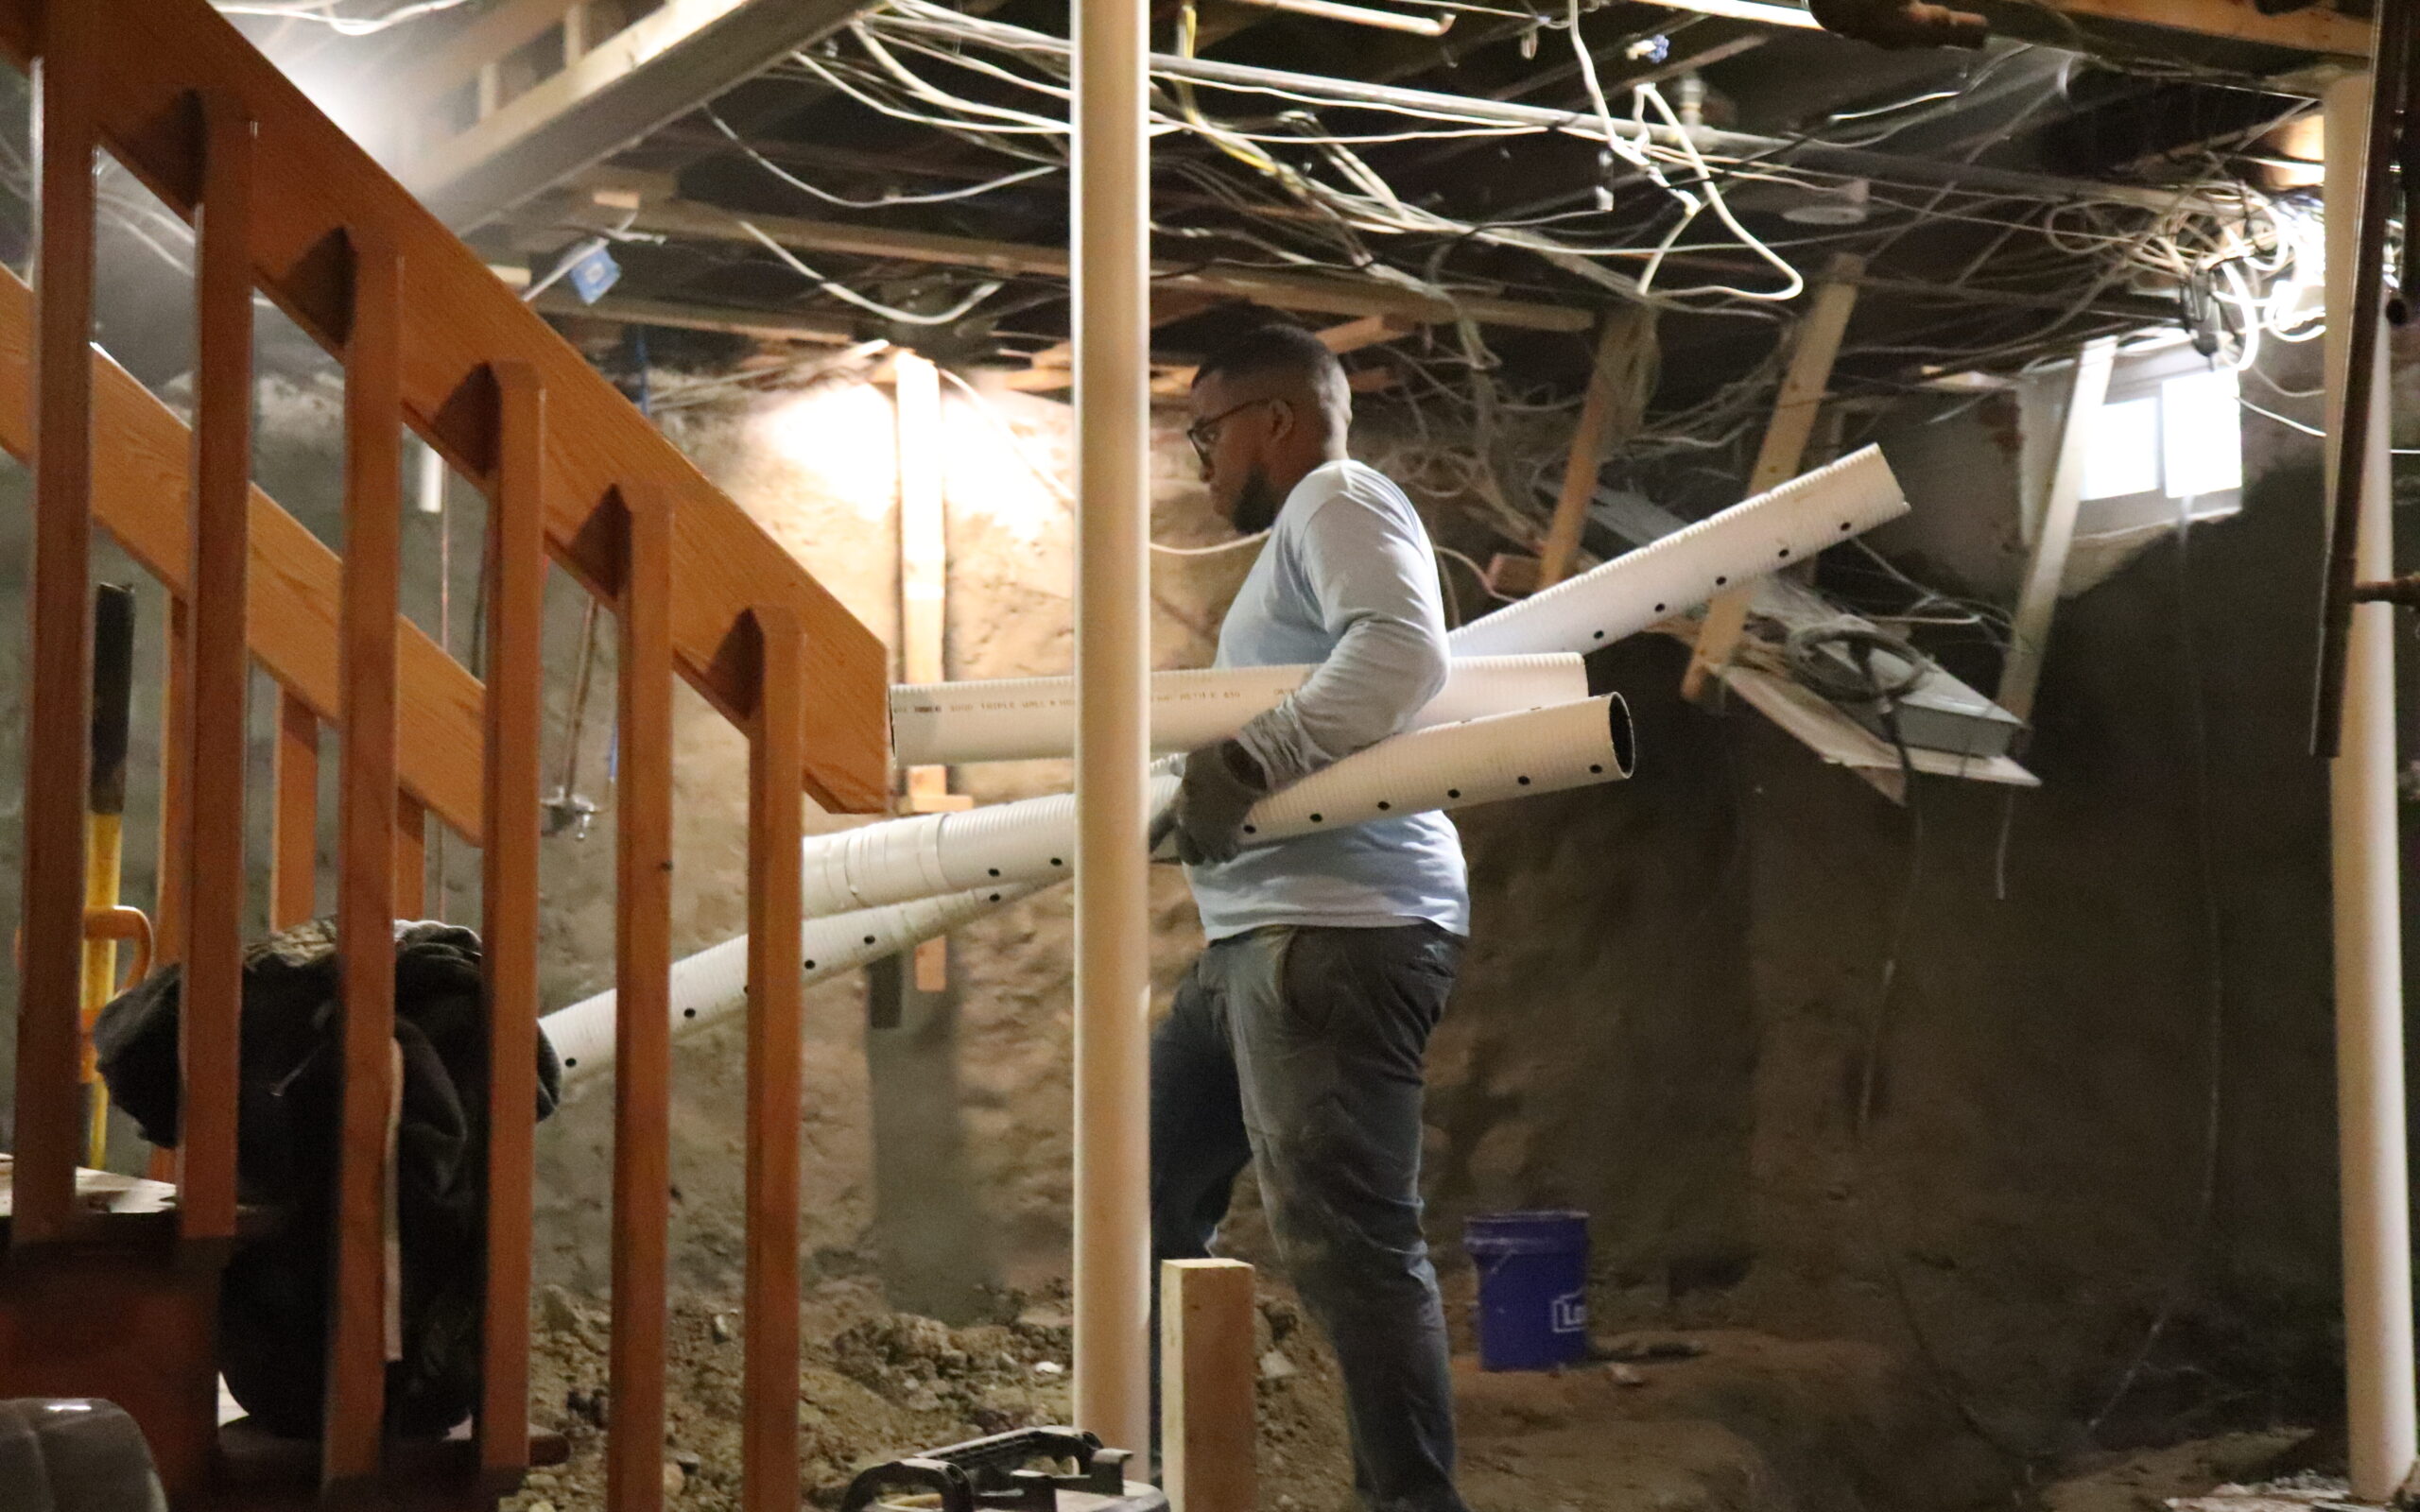
Along the perimeter of your basement, we dig trenches for the French drain and sump pit. Then, starting at the pit, we lay down bed of crushed stone and install drainpipes pitched towards the pit.
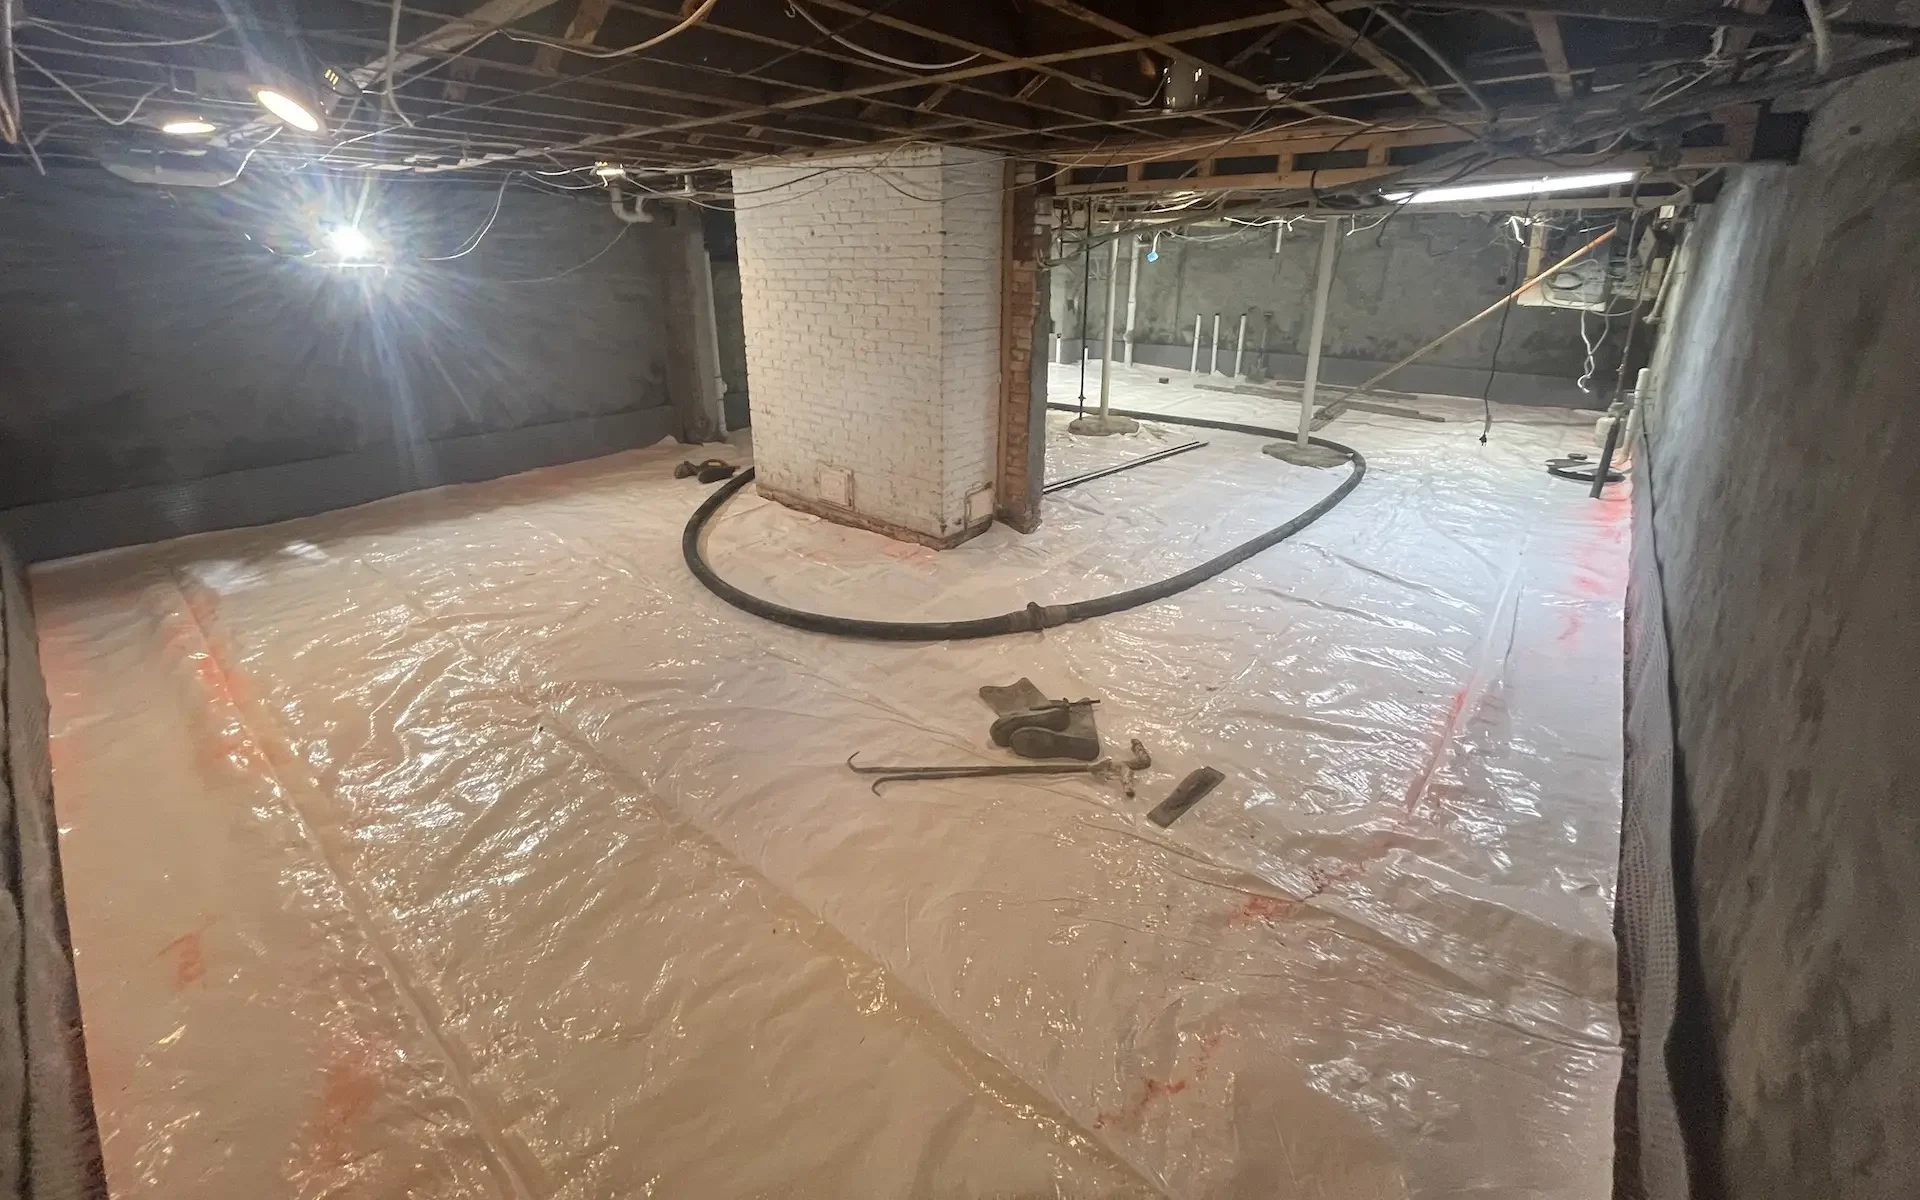
Step 3: Crushed stone and Vapor Barrier
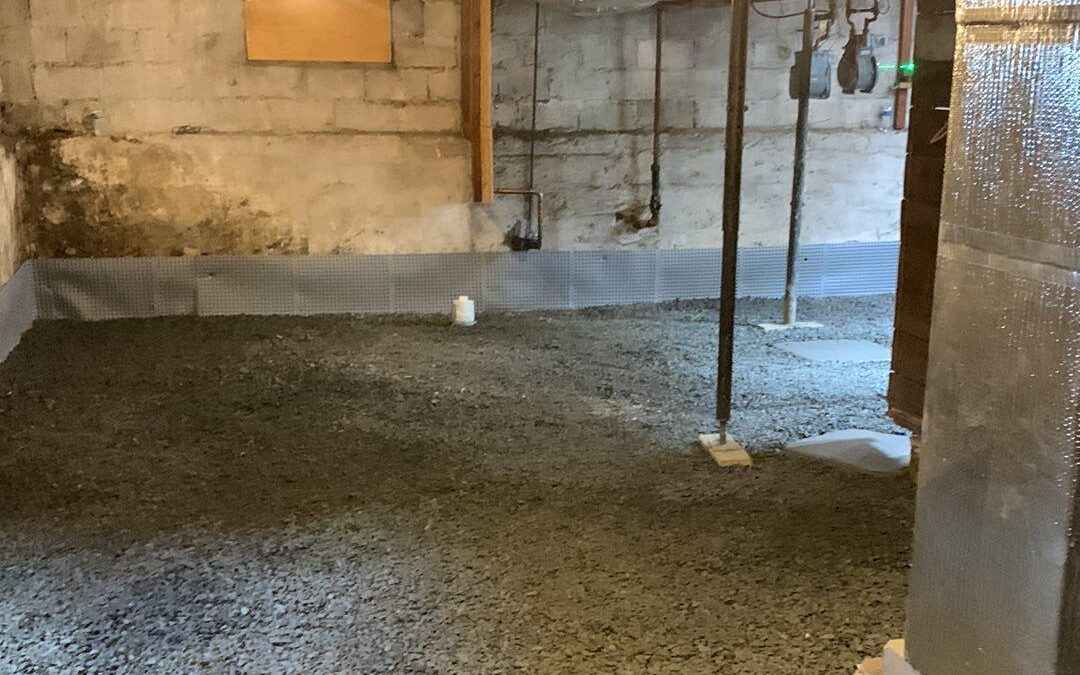
This is a great time to have a plumber lined up to replace old, corroded cast iron sewer pipes. After that’s completed or if that doesn’t need to be done then we move on to pouring 2 inches of crushed stone across the entire basement floor. We compact that down then install a 14mm vapor barrier across the entire basement. If you are insulating your basement with spray foam or foam board that would be next and would replace the vapor barrier.
This is a pivotal step in basement concrete slab replacement and means the difference between a well prepped slab and a poor performing slab. The crushed stone across your entire basement floor allows water to easily flow underneath your slab preventing hydrostatic pressure build up. The vapor barrier/insulation prevents the water from coming in contact with your porous concrete floor. The water will find it’s way to the path of least resistance, your French drain, and be directed to the pit and out of the home.
If you are installing ambient heated floors, then that would be the next step before proceeding to pour your new slab.
Step 4: Pouring Your New Slab
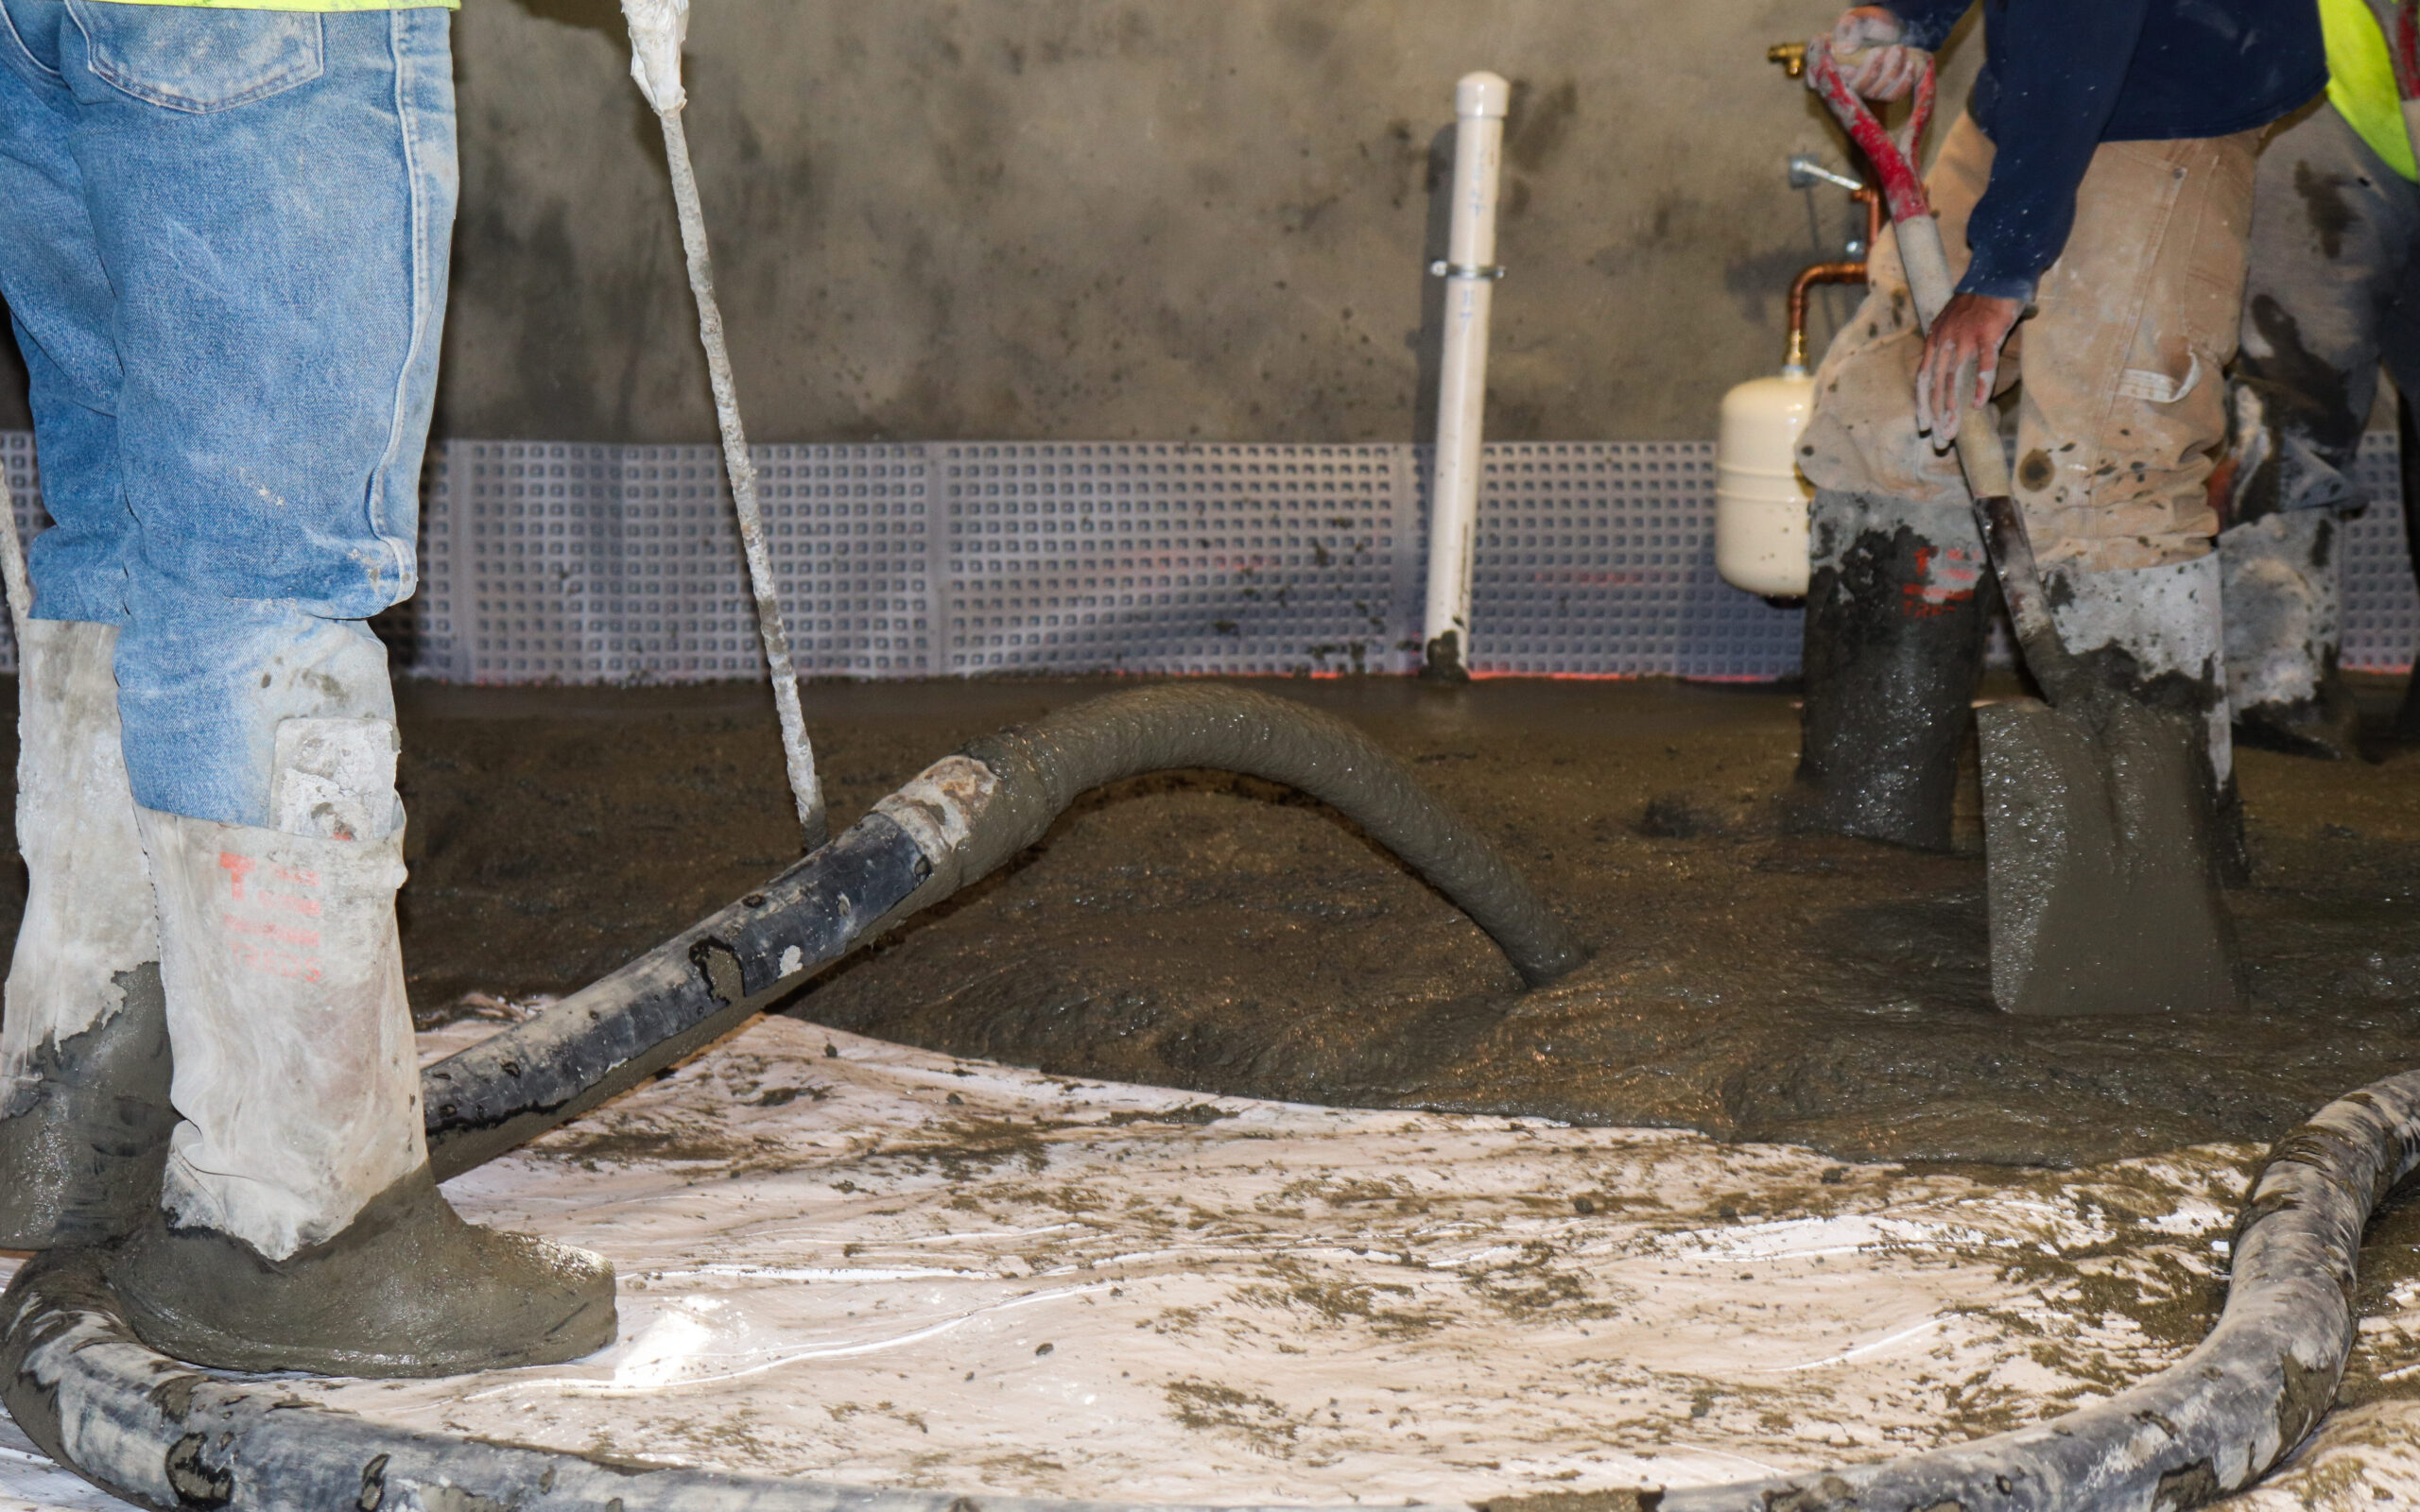
Lastly, we’ll pour a brand new 4-inch concrete slab and level it off. During this phase we install relief joints in your concrete slab to account for cracking during curing. This will ensure that any cracks that appear in your slab due to the curing process are uniform, rather than randomly splintering. Give your slab about a week and it will achieve about 70% of its strength. In about 28 days you can do anything you want to your new basement concrete slab.
In Conclusion:
The evolution of basements from storage spaces to livable square footage highlights the importance of a well-constructed and waterproofed concrete slab. This element not only ensures the structural integrity of the lower level but also plays a pivotal role in keeping the space dry and habitable. Modern basements are now characterized by a meticulously prepared 4-inch slab, designed to enhance energy efficiency and provide a robust barrier against moisture infiltration.
A comprehensive understanding of basement construction reveals three primary components: the footing, which evenly distributes the home’s weight; the wall, which bears the weight of the structure and the surrounding soil; and the floor, which supports floor loads and is designed to move independently of the walls and footing.
This knowledge leads us to understand why waterproofing is at the heart of basement slab considerations. While the slab serves multiple purposes, its role in preventing moisture-related issues like seepage, wicking, and cracking is paramount. A well-prepped and poured slab acts as the first line of defense against these challenges, ensuring a dry and comfortable living space.